


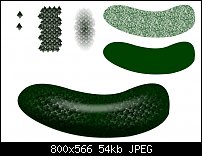
This is a quick look at how I created the dragons skin.
Once I had drawn the main segments of the dragon i.e., the head, body, legs and tail they then needed fleshing out and something resembling a texture (sort of snake like). To start with are the scales and plenty of them. First make one scale shape then apply a bevel, clone the shape and move it to one side so that it just over laps the first one. Group these two and clone again, keep doing this until you have a workable section of scales, the next step is to apply an ellipse transparency this is so you can hide the hard edges and makes it easier to bend the scales round twisting bodies. As you apply the scales to the dragon, be sure to make the scale bigger on the back, smaller on the legs and tapering away down the tail. Now this last bit is where it really gets good. Select the base shape of the section of the dragon that you are working on and clone it, fill with plasma and apply a stained glass transparency. Now group all the contents of that section to keep them safe, apply highlights and shade with the shape tool. With the shades I like to feather the edges and use a transparency be that linear, circular or whatever the shape you are drawing demands. With the highlights I use feather edge only, add shades and highlights into the now finished group.
So the rabbit is out of the hat...!

 Reply With Quote

Bookmarks