And then got a black eye.


 Member
And then got a black eye.
 Member
I like the look it produces, WR. Very cool looking work.
 Member
I like what you are doing, WildRice.
Member
I am new to the Wacom Intuos Pen & Touch Tablet and had only drawn previously with Xara using a mouse.
The first Teddy drawing is actually just practice with the Wacom. I think it is a bit overdrawn and took too much time,
so I just redrew it starting completely over. Although it looks nearly identical, this latest sketch has only about
half the number of lines and took me just half the time. When you lay down thousands of lines Xara P&GD9 gets
a little bogged down and inputs lag. To make Xara more responsive again, I select all of the lines on the drawing layer,
convert lines to shapes, and then add shapes making them one object. Then I start another layer of lines and repeat as
needed. Only down side is that it is harder to correct once shapes are combined. This technique is not difficult at all and
certainly not very original, but is a good way to learn about light. When you draw with a dark pen or pencil, you are drawing
shadow. With this method you are drawing light, which makes it interesting to sketch, and you learn about how light reflects
off of textures. The major pitfall is to avoid overdrawing in white, as pure white has no textural information.
Started over but this time it took half the time.
Member
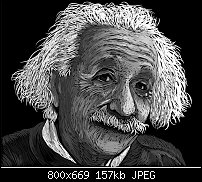
Here is a portrait of Albert Einstein. His photo was mainly grey, so this time I used 9 shades of
grey in addition to white and black. I took care not to overdraw it so you can still see the sketch
marks and texture. This time I used one pen thickness except for a little thicker for the white hair.
 Super Moderator
Albert Einstein looks great, Wildrice.
Did you do that in Xara?
Featured Artist on Xara Xone . May 2011
. A Shield . My First Tutorial
. Bottle Cap . My Second Tutorial on Xara Xone
Member
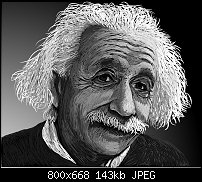
Yes, this was done using Xara P&GD9 and a Wacom Intuos Pen and Touch Tablet (medium, $199). I open a photo with P&GD9 in a layer named Photo, duplicate that layer naming it Background, make the color of the duplicated photo black (creating a perfectly sized black rectangle), add another layer named White Lines, hide the Background to reveal the photo, and then start drawing over the photo on the White Lines top layer.
White Lines (selected for drawing)
Background (hidden)
Photo
When you are finished, unhide the black background and you are left with the sketch lines on a black background. It is basically digital tracing and very easy to do. It just gets meticulous with a detailed photo. You may have to go back and forth between the photo and background to fill in any gaps. The Einstein photo got covered up with lines so I printed the photo out to do some touch ups in this later version. I have found that the major pitfall of this technique is to try to get too perfect and over sketching it. It often looks best with a little black background showing through like an old woodcut. Here is the photo for comparison. Looks like I still need to lighten up his right cheek. I just made the background a gradient as in the photo (darker for more drama), but then grey shined throught, so I had to put a black shape behind him so my black low lights would be evident.
Last edited by WildRice; 05 January 2014 at 04:23 PM.
Super Moderator
Excellent work, Wildrice.
And you've got one of my heroes as your avatar!
Featured Artist on Xara Xone . May 2011
. A Shield . My First Tutorial
. Bottle Cap . My Second Tutorial on Xara Xone
 Posting Permissions

 Reply With Quote

Bookmarks