dcahall, angelize, & gare
Thank you for the very interesting thread. I have to admit this one was a tough one for me.


 Member
dcahall, angelize, & gare
Thank you for the very interesting thread. I have to admit this one was a tough one for me.
Member
Nice one BeanPole, I'd say you made it look easy, love the snake. What techniqe did you favour for the weaving, Clone, Erase or Clip?Originally Posted by BeanPole

Stygg
 Member
I tried all 3 and erasing worked the best for me. A trick Angelize suggest was before I started erasing, put a copy (of the snake or vine) in the back. That way when you erase if you are not exact, the one in the background will show through so and your inaccuracies with the eraser will not show.
I agree, this has been a fun thread.
 Super Moderator
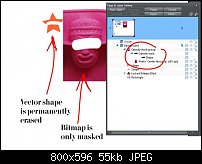
Just a point of fact with the Eraser tool: Vector shapes suffer permanent editing when you use this tool, but on bitmaps (photos, pixel-based paintings, and so on), you're only masking an area and if you open the Page an Layer Gallery, you can edit and delete the mask. also, as long as even a portion of a bitmap is on the page and the document is saved, the "original" bitmap is stored in the Bitmap Gallery and you can drag a copy onto the page at any time.
 Member
You can actually erase a vector object in a non destructive manner. Just set the softness setting to 1% it will still give you a sharp clean edge but what it does is change the way the eraser works and instead of actually changing the shape its self the tool applies an opacity mask.
[SIGPIC][/SIGPIC]
My current Xara software: Designer Pro 365 12.6
Good Morning Sunshine.ca | Good Morning Sunshine Online(a weekly humorous publication created with XDP and exported as a web document) | Angelize Online resource shop | My Video Tutorials | My DropBox |
Autocorrect: It can be your worst enema.
Member
I have now tried this whole process with different (simpler) shapes and have boiled it down to the blend process. This causes everything to be treated differently. I got fairly close but had definitely proved to myself that the intersect shape down not work when there is a blended shape. If you can live with a fairly simple line/vine then the intersect method is very easy to use. Xara Xhris has a very straight forward video on You Tube (thanks for pointing me to that Gare) but it does not work with the blend.
Super Moderator
@Frances. Thanks for pointing that out. I truly didn't know that you could "opacity mask" using the Eraser.
So now you can do both destructive and non-destructive erasing. both are valuable depending on your intention.
@DaveI don't know what your system specs are, but I am able to intersect a line blend of five steps with an ellipse. I'm attaching the file; why don't you try it when you have time to let your system hang. The bottom shape is he product of intersecting the blend lines with the ellipse.
Try this: once you have your Blend group of shapes the way you want them, select 'em and then press Ctrl+Shift+S (Arrange>convert to editable Shapes). Thismathematicallysimplifies the group and you might get where you want to go then. The dynamic blend attribute is destroyed and the blend can't be edited any more. but the result is a group of 7 lines if you do 5 steps, and I think I was able to apply a boolean operation even back in version 4 with a Pentium box!
My Best,
Gary
Oh, and P.S. We're getting O/T again and I'm going to get screamed at for "poaching" activity and privatizing it on the Xara Xone thread. Please share with the entire community when you have a tip, or when you have a general question, cool?
Member
If you have the eraser tool you can easily use it on your blend and you don't have to even set a softness because this is the beauty of this tool if you erase a complex object like a blend or group you automatically get an opacity mask
Edit: Gary you are right we are straying here so I've started a thread in the Xara Graphic Chat forum for discussion and tips and tricks of both the eraser tool and the shapebuilder tool.
http://www.talkgraphics.com/showthre...ols-Handy-tips
Last edited by angelize; 01 March 2013 at 09:29 PM.
[SIGPIC][/SIGPIC]
My current Xara software: Designer Pro 365 12.6
Good Morning Sunshine.ca | Good Morning Sunshine Online(a weekly humorous publication created with XDP and exported as a web document) | Angelize Online resource shop | My Video Tutorials | My DropBox |
Autocorrect: It can be your worst enema.
Member
Actually, it was easy. It was all the things that I did wrong that I had to correct that made it hard! I started out with the tutorial on "Interlocking Rings". This uses the combine shapes - intersect shapes. That was easy and worked very well. Then I did the name and interweaved a snake shape using the intersect shapes.
When I tried to do the line like Gare showed (an earlier post), I couldn't seem to get the intersect shapes to work so I ended up using the eraser. (Later I realized that if I had changed the line to a shape, the intersect shapes likely would have worked!)
For sure the eraser was easy and seemed to work the best for me as well. Ah! Just love that UNDO Button!
Super Moderator
Xara Xhris does have a really nice tutorial on YouTube that demonstrates how to use the Boolean operators in Xara (add, subtract, intersect) to make "neighboring" shapes that overlap one another with a space. I'd shown something like this technique in the Official Guide and an interlocking set of initials like you see on cologne bottles.
Don't forget to use the Bevel tool to make your work look puffy or popping off the page, or engraved. It's quick and easy.
-g
 Posting Permissions


 Reply With Quote


Bookmarks