Hi everyone,
I'm happy to announce we've started the holiday sale on Filter Forge. All editions are offered at a 70% discount, with the Baisc edition priced at only $44. The sale will continue until the end of the year.
-- Mark

 Member
Hi everyone,
I'm happy to announce we've started the holiday sale on Filter Forge. All editions are offered at a 70% discount, with the Baisc edition priced at only $44. The sale will continue until the end of the year.
-- Mark

 Member
Thanks Mark! That's a sweet Deal!and the textures you donated to the Christmas wrapping thread are awesome!
[SIGPIC][/SIGPIC]
My current Xara software: Designer Pro 365 12.6
Good Morning Sunshine.ca | Good Morning Sunshine Online(a weekly humorous publication created with XDP and exported as a web document) | Angelize Online resource shop | My Video Tutorials | My DropBox |
Autocorrect: It can be your worst enema.
 Member
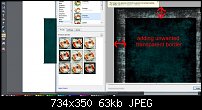
I gave the trial version a go with xara but when I use the live effect tool to bring the selected object into filterforge plugin it adds a transparent border/margin. See attached image. Is there anyway to avoid this happening? It makes it impossible to use it as a plugin in xara to create seamless tiles.
XT-CMS - a self-hosted CMS for Xara Designers - Xara + CMS Demo with blog & ecommerce shopping cart system.
Member
Hi Xtom first the filter you have selected in the screenshot is a photo filter it's not meant to be used as a seamless tile. Filter forge is capable of producing many effects and depending on what the filter author is trying to achieve they don't always tile seamlessly. The grunge filter can be applied to a selection in Xara with out the semi transparent margin if you tweak the filter and add a couple of components in the filter editor.
First In xara create a rectangle over your image that you want to apply the grunge to. Give this rectangle the colour you wish for your grunge.
With this rectangle selected go to your live effects and go to filter forge, one the filter forge window opens and you have the grunge filter open click open filter editor in the upper right ( don't worry you will be editing a copy of the filter so you won't lose the original if things go wrong, not that they will this is actually very easy)
Once you are in the filter editor open the components panel by clicking the components button. click external and drag an image component to the workspace near the result
click adjustments and drag a gamma component to the workspace
click Channels and drag a Set Alpha component to the workspace
Ckick and drag from the green triangle on the image component and "plug it in" to the source input on the gamma component.
Plug the gamma into the Set Alpha component in the same way
Click controls and drag a slider control into the workspace and plug it in to the gamma input of the gamma component you can name this control opacity or something like that. By controling how the gamma affects the externa image that is your selected image in Xara you can control the opacity of your grunge layer.
Click save filter and name your tweaked filter click apply to apply the filter and go back to Xara. Once the filter has been applied lock it by clicking the lock icon on the info bar. Currently All Filter Forge filters must be locked in Xara to avoid an error when Xara tries to redraw the effect. This has been reported to Filter Forge and last I heard they are working on a fix
This tweaked filter still won't be seamless because of the way it's set up to frame the image, but you can find some filters like this one that do produce seamless results.
[SIGPIC][/SIGPIC]
My current Xara software: Designer Pro 365 12.6
Good Morning Sunshine.ca | Good Morning Sunshine Online(a weekly humorous publication created with XDP and exported as a web document) | Angelize Online resource shop | My Video Tutorials | My DropBox |
Autocorrect: It can be your worst enema.
Member
Thanks for the tips Frances. I went for the basic filterforge though and it doesn't have access to the editor. But no matter what you bring into it from Xara and no matter what filter you use it ends up with a transparent border around the imported image. I think it's Xara that is adding this extra space around the image because I also tried using filterforge with PSX3, irfanview and stanalone and it works fine, no transparent border. You can actually see the same border I'm talking about in your second screenshot, when you import you shouldn't see any checkered area around the image, it should fill the entire area. Try importing straight from Xara and then compare it by exporting same image and importing it using just the standalone program and you'll see the difference. I can workaround it but it's a shame that I can't use filterforge with the live effect tool in Xara to create seamless images.
XT-CMS - a self-hosted CMS for Xara Designers - Xara + CMS Demo with blog & ecommerce shopping cart system.
Member
Sorry for a noob question I'm quite unfamiliar with Xara, and its workflow is somewhat different from other graphic apps.
Do you refer to a vector rectangle? If yes, does this mean XDP doesn't have a bitmap selection function similar to that of Photoshop/PaintShopPro?Originally Posted by angelize

Filter Forge expects a bitmap selection, not a vector object, to be passed to the plugin this may be the cause of the issue.
-- Mark
Member
I tried with with just a photo (no vector shapes) and it still adds a transparent border.
XT-CMS - a self-hosted CMS for Xara Designers - Xara + CMS Demo with blog & ecommerce shopping cart system.
Member
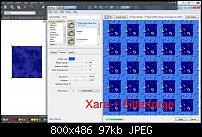
Up in the top level of filters can you apply any of those with seamless tiling checked? Here is a screen grab of what I get when I run FF as plugin and I have a vector shape selected in Xara and I have seamless tiling checked in the filter settings. The filter I was using in the screen grab is called Foil and I think it's one that comes pre loaded with FF.
also I have attached a tweaked version of the Grunge filter which you should be able to apply to a shape in Xara, it isn't set up to tile seamlessly but I may look at doing a seamless grunge for use with Xara some time soon.
I had to zip the filter file as the forum won't accept the Filter Forge file as an attachment, once you download and unzip the file you should be able to open it in Filter Forge by double clicking it. Once you have opened the filter it will appear in the program list (I think under creative but I could be wrong on that) and should remain in the list when you next use FF as a plug in.
[SIGPIC][/SIGPIC]
My current Xara software: Designer Pro 365 12.6
Good Morning Sunshine.ca | Good Morning Sunshine Online(a weekly humorous publication created with XDP and exported as a web document) | Angelize Online resource shop | My Video Tutorials | My DropBox |
Autocorrect: It can be your worst enema.
Member
Some of the filters including the foil one you posted actually cover everything on the original image including the transparent border. But the underlying issue of the transparent border is still there and you can see it depending on the filter you use.
For example I wanted to add some rain drops to an image and make it seamless, but because most of the water filters overlay the original image with transparency you can notice the really bad effect with the border. And if you click the show original image checkbox at the top you can see the checkered background border aswell. That shouldn't be there. If you bring the image into filterforge using any other method other than xara you don't face this problem with the transparent border, the original image covers the entire workspace and you can make tileable images using even more of the filters including the water ones.
Edit: here's two quick screenshots showing the same image with a water filter applied...You can see the transpaerent border that Xara is adding really screws up the tiling effect
Last edited by xtom; 30 November 2012 at 09:07 AM.
XT-CMS - a self-hosted CMS for Xara Designers - Xara + CMS Demo with blog & ecommerce shopping cart system.
New Member (No PMs)
Hi Frances,
I've downloaded the FF3 trial and pointed XDPX to it through the options tab as you showed on one of your tutorials.
I've just typed a letter onto the work area and applied a few random effects. Rather than just filling the vector shape I get the effect as a square tile covering the entire letter?
Any idea what I'm doing wrong?
I also tried copying the FF3 plugin from the programmes folder and dropping it in the PSPlugins folder within the Xara picture editor but same thing happens. You didn't seem to do anything different on your "Bling" tutorial and the effect was just applied within the bounds of the text?
Any help graciously accepted,
Mike.
 Posting Permissions

Bookmarks