Hey guys,
I am looking for a tutorial on how to make a gold coin.
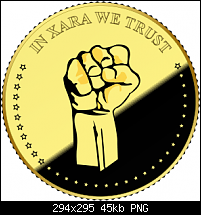
I would like to make one very similar to this one:
Does anyone have any ideas on how to make this?
Thanks

 New Member (No PMs)
Hey guys,
I am looking for a tutorial on how to make a gold coin.
I would like to make one very similar to this one:
Does anyone have any ideas on how to make this?
Thanks

 Moderator Emeritus
Rik is your tutor. I've sent him a heads up. Check back soon.
Welcome to TalkGraphics
Gary W. Priester
gwpriester.com | eyetricks-3d-stereograms.com | eyeTricks on Facebook | eyeTricks on YouTube | eyeTricks on Instagram
New Member (No PMs)
Thank you!
 Super Moderator
I replied to Gary's message, but I see that you are here!
You do not list any Xara products?
I can put some instructions together in Xara, which you can use to easily create the gold coin.
But, not in Illustrator.
I do have Illustrator but have never got the hang of using the tools.
All that I want to do is so easy in Xara, in comparison.
Featured Artist on Xara Xone . May 2011
. A Shield . My First Tutorial
. Bottle Cap . My Second Tutorial on Xara Xone
New Member (No PMs)
I don't have any Xara products but it would be great if you could put some instructions together and I'll give it a shot.
Thanks
Moderator Emeritus
Xara is a really terrific product and can do some amazing things.
Gary W. Priester
gwpriester.com | eyetricks-3d-stereograms.com | eyeTricks on Facebook | eyeTricks on YouTube | eyeTricks on Instagram
 Member
If you still want to use Illy you could try the following:
1. Draw a circle to the size that you want.
2. Copy the circle (Ctrl=C)
3. With your circle selected go up to Effect, - Distort & Transform - Select Zig Zag
4. With the Zig Zag box opened click preview. - Make the Size quite small in value - In the Ridges per Segment option make it around 60 - Check Smooth in Points options. If your happy with that click OK.
5. Paste your copied circle in (Ctrl+V)
6. Align both objects together so that they are centred
7. Using the Pathfinder and both objects centred Add to combine both shapes
8. Make a new layer
9. Ctrl+V again. Using the Selection tool make the circle slightly smaller
10. Make a new layer
11. Use the Type on a Path Tool - With the newly circle selected, watch where you place the cursor as it can effect the position
12. Make new layer
13. Use the Star Tool and draw star to correct size and position it where you want it to start.
14. Next way to get stars arrange around in correct position there are 2 methods that can be used: Blend Tool or the Rotation Tool using constrained angle _it is up to you!
15. New Layer
16. Use bitmap editor to crop the hand & wrist out of the coin & save. The use the Place under the File menu to bring in the bitmap.
17. Use Live Trace on the embedded bitmap with the following settings Black & White Logo with 180 Threshold
18. Expand & Ungroup
19. Delete away unnecessary Parts of your drawing
20. Use Delete Anchor Points tool to get rid of black gradient & use Direct Selection tool to smooth out shape and give the knuckles a more defined shape
21. You will also want to use the D/Selection tools on the inner shape to clean up the shape
22. Now the next thing that you want to do is to use colour
23. Load in the Metal swatches from the Window menu and then down to swatch Libraries and out from there (I would use gold 2 but it depends on what version of AI u are using)
24. In each layer start colouring your objects
25. You are going to have to use gradients for all of your shapes and it would take so long to explain this here so press F1 and search for gradients or use google
26. For your all of your shading I would use an Extrude from the 3D Effects menu. I tried but was not satisfied with my results, would need to spend longer at it
I am at work at the moment so can't spend any more time on the drawing. If you can make a start I can always come back over the weekend and help.
Design is thinking made visual.
Moderator Emeritus
Sheesh, Albacore - That's an awful lot of steps. Surely it would be easier and faster in Xara.
Rik?
Gary W. Priester
gwpriester.com | eyetricks-3d-stereograms.com | eyeTricks on Facebook | eyeTricks on YouTube | eyeTricks on Instagram
New Member (No PMs)
Wow albacore. Thanks!
gwpriester - If you get the chance I would like to see the steps on how to make it in Xara and compare the two. Thanks!
Super Moderator
I hope this isn't a contest?!
Well, here's my attempt.
1. Use the ‘QuickShape Tool’ to draw a starred shape with 99 sides, and increase the Stellation radius
so that you end up with what looks like ridges at the edge of a circle.
2. Draw a circle to be slightly smaller than the quickshape and centre it over the quickshape.
3. Use the ‘Fill tool’ and apply a linear fill with light yellow at both ends
and add two fill handles towards the middle and make these dark brown.
(This circle is going to form the raised edge of the coin)
4. Clone the circle and reduce in size slightly.
5. Give the Circle a line of .25pt and of a dark grey colour.
6. Use the ‘Fill tool’ to give the top end a light yellow colour and the bottom end black colour
- move middle handles of the linear fill closer to each othere and make the two handles to match the nearest outer edge.
7. Clone this circle, make the centre transparent, and make it more than slightly smaller!
(this is the guide to place your small 5 point stars)
(in Xara, I drew a yellow star with a black outline and made a brush and applied this to a curve of the desired size)
8. Use the ‘QuickShape Tool’ to draw a starred shape with 5 sides.
(If you don’t know how to creat a brush, then place your small stars in the appropriate places)
9. Type the text you want (IN XARA WE TRUST) in Times New Roman and of a desired size.
10. Colour the text to be the same colour as the golden yellow of the coin and apply a line width of 1pt and a dark brown colour
11. Draw an outlined circle and lesect the text and the circle and apply ‘Fit Text to Curve’
12. Rotate and position the text in the desired position.
13. Use the ‘Shape Tool’ to draw (or trace over) the black outlind of the hand.
14. Then draw the yellow parts of the hand
15. Then draw the smaller orange parts of the hand.
To get the curved shape of the dark shading on the coin, I would clone and cut and use transparency etc...
A good tutorial would be accompanied by stepped drawings to go with the instructions.
That takes a bit longer than what I've written above.
So, 'myladybugg', get Xara PDQ and then there's a ton of tutorials you are going to love doing.
Featured Artist on Xara Xone . May 2011
. A Shield . My First Tutorial
. Bottle Cap . My Second Tutorial on Xara Xone
 Posting Permissions


Bookmarks