Welcome to TalkGraphics.com
Page 1 of 3 123 LastLast
Results 1 to 10 of 22
  1. #1
    Join Date
    Dec 2018
    Location
    Australia
    Posts
    1,775

    Default Colour Editing PNG

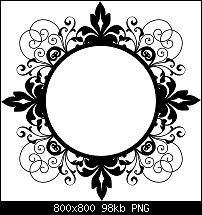
    I'm playing with XDP and started throwing frames at things. Of course I wanted to colour said frames, no problem, pick Dark Contone and colour away. Then I wanted to colour just parts of the frame, I can't do that.

    How would I colour, say, the for main spikes without cutting them out and gluing them back on? Or, how would I add a gradient without it turning into a square?

    Don't know if this is relevant, but the png was converted from an abr file.

    Click image for larger version. 

Name:	Swirl Frame Brushes By Diana_2.jpg 
Views:	97 
Size:	98.3 KB 
ID:	125071

  2. #2
    Join Date
    Feb 2007
    Location
    UK
    Posts
    21,297

    Default Re: Colour Editing PNG

    assuming it's black and white

    clone, give clone a multiply transparency add colour shapes between, then group and if necessary make bitmap copy

    if it's black and alpha cloning and multiply not necessary

    if it's not black and white it becomes more 'interesting

    there again if you want to colour the spikes themselves and not the spaces..... cutting them out is probably the way to go, but I would again do that on a clone and maybe feather the edges if necessary - or apply transparency to mask out
    Last edited by handrawn; 08 September 2019 at 07:59 AM. Reason: think i misunderstood
    -------------------------------
    Nothing lasts forever...
  3. #3
    Join Date
    Feb 2007
    Location
    UK
    Posts
    21,297

    Default Re: Colour Editing PNG

    sorta like this ?

    Click image for larger version. 

Name:	sorta like this.png 
Views:	73 
Size:	229.6 KB 
ID:	125072

    sorta like this.xar


    if you want to apply gradient you'll need to bitmap trace the black first I think
    -------------------------------
    Nothing lasts forever...

  4. #4
    Join Date
    Dec 2018
    Location
    Australia
    Posts
    1,775

    Default Re: Colour Editing PNG

    Yes, but no. I'll attach the xar, which I should have done initially because my description sucked. I also don't understand how the transparency will help with colouring only various parts, but that maybe because it does have an alpha channel as you mentioned. The example above is what I'm after though.

    Frame.xar

  5. #5
    Join Date
    Aug 2000
    Location
    Harwich, Essex, England
    Posts
    21,914

    Default Re: Colour Editing PNG

    Chris,
    Clone the shape. Change the dark contone to red. Apply a elliptical transparency over the East spike. Adjust the profile.
    Clone. change colour to green. Move the elliptical fill to centre on the Western spike.
    Repeat for the North & South spikes.
    Attached Thumbnails Attached Thumbnails Click image for larger version. 

Name:	export.jpg 
Views:	70 
Size:	80.5 KB 
ID:	125076  
    Attached Files Attached Files
    Egg

    Intel i7 - 4790K Quad Core + 16 GB Ram + NVIDIA Geforce GTX 1660 Graphics Card + MSI Optix Mag321 Curv monitor
    + Samsung 970 EVO Plus 500GB SSD + 232 GB SSD + 250 GB SSD portable drive + ISP = BT + Web Hosting = TSO Host

  6. #6
    Join Date
    Mar 2009
    Posts
    4,503

    Default Re: Colour Editing PNG

    Elegant solution, Egg.

  7. #7
    Join Date
    Dec 2018
    Location
    Australia
    Posts
    1,775

    Default Re: Colour Editing PNG

    Thanks Egg, I was doing something similar but cutting and pasting. As you and handdrawn have admirably shown, Xara is highly capable of doing the precise (mathematical) design work, but a painting program is better suited for, say, putting an artistic sweep through the filigree, or adding a touch to the points.

    My daughter dropped it into Medibang and simply 'painted' a colour on then smudged it. A lot simpler and very effective.

    This was just me playing and learning, it wasn't a specific need.

  8. #8
    Join Date
    Mar 2009
    Posts
    4,503

    Default Re: Colour Editing PNG

    Quote Originally Posted by Chris M View Post

    My daughter dropped it into Medibang and simply 'painted' a colour on then smudged it. A lot simpler and very effective.
    Love to see the result.

  9. #9
    Join Date
    Dec 2018
    Location
    Australia
    Posts
    1,775

    Default Re: Colour Editing PNG

    Quote Originally Posted by Boy View Post
    Love to see the result.
    Just a few stroke of the pen. Don't forget we wern't aiming to actually achieve anything, just to see how something could be done.

    Click image for larger version. 

Name:	swirl 2.jpg 
Views:	77 
Size:	97.4 KB 
ID:	125080

  10. #10
    Join Date
    Aug 2000
    Location
    Placitas, New Mexico, USA
    Posts
    41,502

    Default Re: Colour Editing PNG

    Since I have been doing this almost every day for my new stereogram images.

    1. Place the black and white image over something colorful
    2. Apply a Screen (Bleach) transparency (Screen makes black transparent but maintains the opacity of the white)
    3. Create a bitmap copy, True Color (no alpha)
    4. Use the Photo Tool > Select Color to Enhance, select the white, right click and select Make Transparent.
    5. Garnish to taste
    Attached Thumbnails Attached Thumbnails Click image for larger version. 

Name:	step one.png 
Views:	73 
Size:	156.9 KB 
ID:	125077   Click image for larger version. 

Name:	step two.png 
Views:	71 
Size:	122.0 KB 
ID:	125078  

    Click image for larger version. 

Name:	step three.png 
Views:	70 
Size:	133.8 KB 
ID:	125079  


Tags for this Thread

Bookmarks

Posting Permissions

  • You may not post new threads
  • You may not post replies
  • You may not post attachments
  • You may not edit your posts
  •