Welcome to TalkGraphics.com
Page 1 of 2 12 LastLast
Results 1 to 10 of 15

Thread: Paint road map

  1. #1
    Join Date
    Oct 2015
    Posts
    11

    Default Paint road map

    I want to use a street map as the base graphics for 3D project. The data I have is in OSM (open street map) which I can convert to SVG or other 2D vector formats. I would then import that into XARA.

    But once I have these 2D lines (which have the outlines of the roads, rotaries, intersections, parking lots, etc.) All I have is lines.

    That gives me a lot of curves but nothing else. I want to paint the streets black (these are 2 and 3 lane roads, put markings on the streets etc.)

    I have Photoshop and XARA (I prefer xara for this artwork) any idea on how to paint the trees, vegetation, and other street markings and make them stay in the outlines of the road?

    For example, I would like to fill the road with black paint and put a yellow line down the middle. But roads are not necessarily water-tight, so fill is not the right tool.

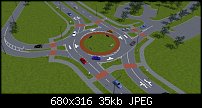
    It does not have to be as pretty as below, but that would be nice:

    http://www.bi-constructionnews.com/u...der_7_3443.jpg
    Click image for larger version. 

Name:	Foth_NW62nd_Render_7_3443.jpg 
Views:	200 
Size:	35.0 KB 
ID:	110468
    Last edited by DoctorG; 08 October 2015 at 08:48 PM. Reason: added picture

  2. #2
    Join Date
    Feb 2010
    Location
    Ottawa, IL USA
    Posts
    1,138

    Default Re: Paint road map

    Well, I make maps for game publishers as my primary use of Xara. If the road shapes you are importing to Xara, are closed shapes, you can fill them with whichever colors or photo image fills you'd need. However, if the SVG or other 2D vector import format are not closed shapes they cannot be filled - you have to close all shapes first. Honestly if I were wanting to create an accurate map using Xara of a real world place, I would import an image format (JPG, TIF, etc) and not a vector format. Then I'd trace the shapes of each road and insure that the shapes are closed so I can fill it however I wish.

    Currently, in fact, I am doing just that. I usually create maps of fictional places, so I create the entire maps from scratch, however, I am creating a map of a resort campground, and I am using Google Maps and a screen capture app as my base, then tracing all the elements in Xara.

    The attached Google Maps screen capture shows the entire property I am working on, however, I actually captured five images much closer in than this image. The next image is what I have done so far (just the outline of the roads on the property), though I plan to place trees, show terrain with onsite creeks, ravines, etc - which you cannot see in the Google Maps capture. I will actually visit the site in person and take photos of the unseen terrain beneath the trees. Note: I have a lot more to do, and haven't even used any fills yet. I need to find out if these roads are asphalt or gravel, before I fill them.

    Click image for larger version. 

Name:	woodsmoke-entire.JPG 
Views:	187 
Size:	94.1 KB 
ID:	110469Click image for larger version. 

Name:	road-plan.jpg 
Views:	158 
Size:	70.5 KB 
ID:	110470

  3. #3
    Join Date
    Oct 2015
    Posts
    11

    Default Re: Paint road map

    The area is very small (30 acres) and I don't have detailed imagery that is up to date. But I do have GPS traces which I have converted into vector maps, so vector is what I start with. But we want a stylized background. Looks like I should create new layer on top of the one with open shapes, and have closed shapes and then do the fill.

    Any particular paint tools you recommend for putting down road markings? (e.g. double yellow line, ped crossing, bike lane, vegetation fill, etc.
    Last edited by DoctorG; 08 October 2015 at 09:05 PM. Reason: added details

  4. #4
    Join Date
    Feb 2010
    Location
    Ottawa, IL USA
    Posts
    1,138

    Default Re: Paint road map

    Quote Originally Posted by DoctorG View Post
    The area is very small (30 acres) and I don't have detailed imagery that is up to date. But I do have GPS traces which I have converted into vector maps, so vector is what I start with. But we want a stylized background. Looks like I should create new layer on top of the one with open shapes, and have closed shapes and then do the fill.

    Any particular paint tools you recommend for putting down road markings? (e.g. double yellow line, ped crossing, bike lane, vegetation fill, etc.
    I use Xara to create the entire map.

    For the double yellow lines, I would draw a line of appropriate width, then I would convert line to shape with transparent fill and lines the color of yellow you'd need (I'd color pick the yellow from the photo capture to color the lines). As stated on my previous post, I use photo image fills, which I would apply as a repeating texture for grass (for example). Below are some samples of photo image textures I use in maps like these. Asphalt, grass, and gravel.

    Click image for larger version. 

Name:	AsphaltDamaged0057_35_S.jpg 
Views:	195 
Size:	82.7 KB 
ID:	110471Click image for larger version. 

Name:	grass-new.jpg 
Views:	137 
Size:	23.9 KB 
ID:	110472Click image for larger version. 

Name:	gravel.jpg 
Views:	193 
Size:	117.8 KB 
ID:	110473

  5. #5
    Join Date
    Aug 2000
    Location
    Harwich, Essex, England
    Posts
    21,921

    Default Re: Paint road map

    Hi DrG, welcome to TG.

    You can use lines of various stroke widths to create very easy but complex road maps. As Game printer states giving a line a large width and then converting lines to shapes works very well.
    Attached Files Attached Files
    Egg

    Intel i7 - 4790K Quad Core + 16 GB Ram + NVIDIA Geforce GTX 1660 Graphics Card + MSI Optix Mag321 Curv monitor
    + Samsung 970 EVO Plus 500GB SSD + 232 GB SSD + 250 GB SSD portable drive + ISP = BT + Web Hosting = TSO Host

  6. #6
    Join Date
    Oct 2015
    Posts
    11

    Default Re: Paint road map

    Perfect. Now this newbie is going to have to bone on up using the shape and straight line tool. I always get confused when trying to take an existing line and add a connected line at a later time to it. As well as closing the object and making it a shape.

  7. #7
    Join Date
    Feb 2010
    Location
    Ottawa, IL USA
    Posts
    1,138

    Default Re: Paint road map

    Once you convert your lines to shapes, adding additional lines (as shapes) later in your process, then Arrange/Combine Shapes/Add Shapes, makes it easy-peasy to connect them.

    Incidentally, I enjoyed how Egg used my provided grass and asphalt textures into his road sample map - I wasn't expecting that.

  8. #8
    Join Date
    Dec 2007
    Location
    Sunshine Coast BC, Canada. In a beautiful part of BC's temperate rainforest
    Posts
    9,864

    Default Re: Paint road map

    If you have a version 11 program you can use artbrushes to create complex road systems complete with pavement, gravel shoulders, dirt roads, and line markings, that will be resizeable and will follow even tight corners.

    I have done a mock up of a simple rough paved road with gravel shoulders. The process is simple:

    1. layout the linework for your roads each road is a simple line don't worry about the size at this point.

    2. You will need to create a small repeating section of road. Start with a rectangle that will be your road section fill it with a colour or repeating bitmap texture (make sure the texture aligns perfectly at the edges) start with the bottom (gravel shoulders for example then add another layer for pavement and use a multistop linear transparency for a soft edge or just make the pavement thinner to show the gravel shoulders

    3. Road markings can be added last make sure that dashed or broken lines are aligned by creating one line segment ( a small thin rectangle can be used for this) then turn on the snap to objects (the magnet icon on the info bar) and snap the center of your line segment to the center of one side of your road section then hold control while right clicking and dragging to drag a duplicate to the other side of the road section and snap it to the center of that edge. Use the blend tool to blend from one line segment to the other and adjust the steps to get the desired gap between line segments.

    4. When all layers of your road section are in place select them all and hit Q on your keyboard to apply a clipview. Now you can use this as a brush definition object and if all textures and markings are correctly aligned it should repeat perfectly.

    5.With your brush definiton object selected select the freehand and brush tool and click the create brush button, select create artbrush in the create brush dialogue, name your brush and click ok. By default your brush will stretch along the path but that's not what you want so click edit brush and select repeat along path for scalingand make sure ignore is selected for line colour. Click ok and your brush is ready.

    6. select all your lines you have laid out for your map and open the line gallery. Expand the document brushes folder and double click your road brush to apply it to your line. set the point size of the lines to set the size of your roads. If you are working to scale you will need to convert the points to whatever measurements you are using (you can fine many conversion charts and converters online)

    7. You may need to do a bit of touch up at the intersections, but as you are still working with lines they are fully editable as lines. you can change the end caps of the lines in the line gallery if necessary and the eraser tool set with a slightly soft nib works well for this.

    I've attached a sample file and I too borrowed the asphalt and gravel you provided Gamerprinter, I hope you don't mind. ( I used my own grass though)

    Edit: you could also create snap in intersections, on ramps etc the same way PhilM created the railroad tracks with switchers (if you use live copies like Phil did you could even switch your roads from right driving to left for doing maps from different countries!
    Attached Thumbnails Attached Thumbnails Click image for larger version. 

Name:	Roadmaps.jpg 
Views:	162 
Size:	63.5 KB 
ID:	110488  
    Attached Files Attached Files
    Last edited by angelize; 10 October 2015 at 04:14 AM.
    [SIGPIC][/SIGPIC]
    My current Xara software: Designer Pro 365 12.6

    Good Morning Sunshine.ca | Good Morning Sunshine Online(a weekly humorous publication created with XDP and exported as a web document) | Angelize Online resource shop | My Video Tutorials | My DropBox |
    Autocorrect: It can be your worst enema.

  9. #9
    Join Date
    Aug 2000
    Location
    Harwich, Essex, England
    Posts
    21,921

    Default Re: Paint road map

    Not the way I'd normally go about this Frances but it's interesting to note that you can create a very long long brush with very few repeating objects.

    I attach the xar file & a screen grab of the long repeating brush. Unfortunately converting the brush to Repeat along the Path also altered the original shapes to a brush and changed all car colours to red, but the brush still has the original colours.

    The apparent breaks across the road are meant to be lamp posts which really didn't work
    Attached Thumbnails Attached Thumbnails Click image for larger version. 

Name:	path-before-repeat.jpg 
Views:	145 
Size:	71.1 KB 
ID:	110498  
    Attached Files Attached Files

  10. #10
    Join Date
    Oct 2015
    Posts
    11

    Default Re: Paint road map

    I really liked Egg's first solution. In our case, our SVG graphic of roads is accurate to 4 cm (geo-coordinates) and it is key to make sure that the paint follows the lines (roads, rotaries, and other items). So Frances solution is good for artists, but we are trying to make something that is Geo-rectified and fits exactly the outlines that the survey team is doing with high-res gps loging and then creating the svg (actually they create Open Street Maps, and we convert it to SVG).

    We have found that we need to convert the lines to shapes, since a lot of the roadwork in line format is not closed polygons.


Tags for this Thread

Bookmarks

Posting Permissions

  • You may not post new threads
  • You may not post replies
  • You may not post attachments
  • You may not edit your posts
  •