Could someone help me whit how im supose to go on whit my drawing?
Im trying to get it to look like a real car.


 Member
Could someone help me whit how im supose to go on whit my drawing?
Im trying to get it to look like a real car.
Last edited by Patman; 28 February 2007 at 11:45 AM. Reason: Updated pic
Member
Add wheels :-)
Sorry, I just couldn't resist. It looks like a very nice start though.
Member
All in due time man
 Member
Patman, type cars into search then look at some of the examples found, you will see highlights, reflections, tyre treads, glass, chrome,grills etc try to work out how they were done, that's how I learned especia;;y from Ron, Sally and Raymond and so on.Also look for any .xar files if present and from them you can break down the picture to get some ideas. I have attached one of my own to give you some ideas.
.Norman
 Member
Have a look at what other people have done and copy that for your fist time. If it was me that was doing it I would name the main shde of blue that your are using and then take tints from that. If in a later time that you wish to change the colour you can quite easily change the whole car to a different colour by changing and using another named colour.
Once you have the car colours sorted out then start on the transparencies to give the car the shiny highlights.
Ron Duke who is simply the best when it comes to cars has done a few tutorials on the subject on the Xone:
http://www.xaraxone.com/guest/guest57/
http://www.xaraxone.com/FeaturedArt/oct05/
I am sure he will be a long latter
By the way you have got the shape right just another 2 hours work to get it finished. Well done
Design is thinking made visual.
Member
Starting to get a hang on this dont i guys.
 Member
Not much to add to what others have written.Originally Posted by Patman

When I have a problem I tend to get back to basics and ask:
"This is what I have, this is what I want - what is it I need to do to get from where I am to where I want to be?"
In drawing, this means defining exactly what is the difference between what one has and what one wants.
As soon as this difference is defined, one has a starting point from which improvements may be made.
That is a (possibly obvious?) exercise which some folks don't consider.
As it happens you only have two options: change the shape of an object or change the fill of an object.
I hope that simplifies things.
P.S. Re 'Fill' - includes transparency and feathering.
Last edited by Intbel; 28 February 2007 at 12:13 PM. Reason: Postcript.
"Intbel" ... "Can't" is not an option.
Compliance is futile. Resistance is futile. Just do your own thing an' ignore 'em.
 Member
Looking good, Patman.
I find that the following helpful when I'm doing vehicles. Caveat: This my way of working and may not suit you or be the best way of doing things, but hopefully you'll find something of interest.
1. When the body shape is complete, I give it a flat fill in the chosen base paint colour. This is the actual paint colour without highlights or shades. I name the colour (as Remi suggests) and put the body shape on it's own layer. I mostly then copy this layer and stick the copy in the background for later use (my preference but not strictly necessary). *
2. I then build up the vehicle using layers for different parts (wheels, interior and so on).
3. When I come to make highlights and shading (using feathered shapes, transparencies etc.), I use layers over the base body colour layer. The advantage here is that it is non-destructive, as the highlights or shades are separate from the main body paint. Again, these should be named shades of the base colour as Remi pointed out.
* With regard to the copy of the body shape. I use this or actually copies of it when I need a quick and accurate way to fit some shading, or whatever. Using the Shape Editor Tool, I can delete points to isolate the section of the body I wish to work with. Then, put the resultant shape it's own layer to work on. This saves drawing new shapes which may not be an accurate fit. I hope this makes sense.
4. ClipView rocks! Using this function makes life a lot easier in many cases. You can apply your highlights and shading in any way you see fit. These can extend beyond the shape you're working on, then just "clip" them to your shape and position as necessary. Very cool!
5. Stick at it and you'll get there in the end.
Last edited by stratocast; 28 February 2007 at 12:21 PM.
-- Bob
Member
Thank you all for your help. I just have to go on playing around
But i feel im gettin there...u just watch out guys....some day iil astonis u all
 mod
Member
mod
Member
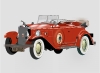
Only one time , did I try to make a nice car in Xara, I think it turned out ok though for my first try on a semi realistic looking car.
I have attached my .xar file and you are welcome to save it and ungroup the car and see the different parts and how i made it.
Unlike others here, I dont use layers or named colors.
So you see you just need to practice and develop your own style..
And your cars are looking better all of the time.
Last edited by a4hire; 01 March 2007 at 05:03 PM.
Bruce
----------------------------------------------------------
Happiness is free for the taking, Please take some for yourself
Artist For Hire

 Reply With Quote

Bookmarks