Have such a photo, with an area located lower middle. Is there a way to change this brightness to match the surrounding dark tones?
Is it possible to scribe around the area and use a control (s) to vary the inscribed colours?

 New Member (No PMs)
Have such a photo, with an area located lower middle. Is there a way to change this brightness to match the surrounding dark tones?
Is it possible to scribe around the area and use a control (s) to vary the inscribed colours?
 Member
Best to show the image to get the best feedback.
 Moderator Emeritus
Use the Effect Painter > Brighten in the Photo Tool fly out menu. Or Dodge Soft.
Experiment with different settings and softness of the brush.
These are non-destructive edits and you can use Edit > Undo, or Ctrl click on the edited area with the Selector Tool and delete.
If you are happy with your edits and want to make the edits final, select Arrange > Flatten Photo Group.
Gary W. Priester
Mr. Moderator Emeritus Dude, Sir
gwpriester.com | eyetricks-3d-stereograms.com | eyeTricks on Facebook | eyeTricks on YouTube | eyeTricks on Instagram
New Member (No PMs)
Thanks 'gwp' for the response. Have followed your suggestion, but can't remove the surrounding boundary line before the Arrange and Flatten step.
How to make the boundary less pronounced?
Moderator Emeritus
That's what the Softness slider is for. It feathers the edge of the brush to the effect is blended with the unaffected part of the photo.
Gary W. Priester
Mr. Moderator Emeritus Dude, Sir
gwpriester.com | eyetricks-3d-stereograms.com | eyeTricks on Facebook | eyeTricks on YouTube | eyeTricks on Instagram
 Member
Hi Flyboat, as Paul asked is it possible for you to post the image for us to look at? Without actually seeing the image I can't tell what method or methods I would use to fix it. If I could see the image then I'd look at the area that is damaged and determine what tools and methods of using them would give the best results.
[SIGPIC][/SIGPIC]
My current Xara software: Designer Pro 365 12.6
Good Morning Sunshine.ca | Good Morning Sunshine Online(a weekly humorous publication created with XDP and exported as a web document) | Angelize Online resource shop | My Video Tutorials | My DropBox |
Autocorrect: It can be your worst enema.
New Member (No PMs)
Thanks Angelize for the offer.
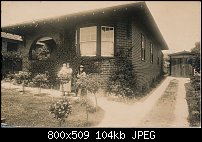
The attached photo is quite old, having been taken with an old Kodak camera in early 1930 - pretty old heh?
Had no trouble converting the sepia to b & w and enhancing it somewhat. But, the bright spot in the lower section always remains.
Your assistance is appreciated.
 Member
What resolution and file type did you scan your print at? Both of these questions are important as they will effect the results that you can achieve in any bitmap editor. Some prep work can be done by your scanner software and you can set the DPI/ppi (i know they are not the same) and the file type and in some scanner you can do more by adjusting contrast and the like. If I was in your shoes and your scanner software allowed save your scan as a TIFF or PNG at around 300 to 600 dpi. If you cant save your file in any of those 2 file types and you have to save it as a JPEG do it with the least compression that your scanner software will allow as you want the best file that you can get from your scanner.
Now take your photo into Xara. I would say to you, you can achieve a better result in the newly released Designer Pro as it has improved its photo handling so download a free 30 day trial. I would start off using the "brightness level channels" in your photo tool. Once you have selected this tool the histogram opens up and you have a mountain of levels between three levels sliders, one for shadows, midtones and one for highlights. Just leave the middle midtone slider where it is and try and bring the shadow (black) slider towards the start of the mountain and do the same for the highlights. You might not be able to bring the highlight slider under the righthand side of the mountain but bring it in as much as you think is right. You can adjust certain channels yourself up where you see "Joined RGB" you can select if you want each colour even though it is black and white and blue would be the main one to adjust slightly using the method as I described above.
The next part I will leave to others to complete as I haven't downloaded the new Designer Pro yet so others who have been beta testing the programme should have more experience for the next part. To give them a good chance and so that you can go a little bit further yourself duplicate your photo and place it a new layer above the original. Frances would be the best one to lead you through the next process. I would use the Freehand Magnetic Tool to select you bleached area of your photo and once you have the marching ants around that area using one of the new Blending Modes to darken only this area down, Colour Burn would be the one I would use here. Hope this helps
Design is thinking made visual.
Member
Hi Everyone, after having a look at the photo I put together a video to show you how to make sublte restorations without losing that certain ambience that old photos have. In the video I quickly went over the techniques but my finished photo didn't redraw properly causing the lost patch in the video. I think that was due to having another window running at the same time as DP and my screen recorder. So I have attached a copy of it here. Edit: Aparently attachments aren't working again, so I'll attach it later)
As Albacore already explained a high res scan makes a world of difference so keep in mind I was working with a screen res copy from this thread. Also when scanning old photos you do want to take care in handling them I've done some that date back to the late 1800's and used white cotton gloves and took my time both in loading/unloading from the scanner and in editing. Like Albacore suggested I used a high res TIFF format.
[SIGPIC][/SIGPIC]
My current Xara software: Designer Pro 365 12.6
Good Morning Sunshine.ca | Good Morning Sunshine Online(a weekly humorous publication created with XDP and exported as a web document) | Angelize Online resource shop | My Video Tutorials | My DropBox |
Autocorrect: It can be your worst enema.
New Member (No PMs)
Many thanks for the responses. Have just forked out money for V12 of this programme and want some value from it before switching to another app. Is not Designer Pro mainly for web and graphic development rather than photo manipulation.
Will dig out the original photo and rescan along the lines suggested and see what can be done with the TIFF format.
 Posting Permissions

 Reply With Quote
Bookmarks