Welcome to TalkGraphics.com
Results 1 to 7 of 7
  1. #1
    Join Date
    Aug 2015
    Location
    London
    Posts
    14

    Default Colour Select & Erase Tool

    I have just upgraded from Photo & Graphic Designer v9 to the latest v11.

    In v9 there was a colour select/erase tool on the toolbar which I found very useful. (see attached screenshot) However, I cannot seem to find this same tool anywhere in v.11 of the program.

    Anyone know what has happened to it?

    Thanks

    Christian Steiner


    Click image for larger version. 

Name:	xara pgd 9.jpg 
Views:	187 
Size:	39.5 KB 
ID:	110938

  2. #2
    Join Date
    Apr 2015
    Location
    Germany
    Posts
    927

    Default Re: Colour Select & Erase Tool

    There is a new colour selector in the photo tool. The old one has been moved to the button palette.
    Attached Thumbnails Attached Thumbnails Click image for larger version. 

Name:	colour select.png 
Views:	164 
Size:	15.0 KB 
ID:	110939  

  3. #3
    Join Date
    Jan 2006
    Location
    Urmston, Manchester,England
    Posts
    2,527

    Default Re: Colour Select & Erase Tool

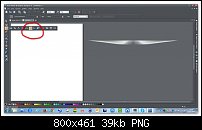
    Hope this answers your question siran, P&GD11 is a different set up. As you can see you will have both buttons available then
    select/erase and Set Photo Hue.

    Stygg
    Attached Thumbnails Attached Thumbnails Click image for larger version. 

Name:	ScreenCapture.jpg 
Views:	152 
Size:	75.9 KB 
ID:	110940  

  4. #4
    Join Date
    Dec 2014
    Location
    San Diego
    Posts
    362

    Default Re: Colour Select & Erase Tool

    Wow, that's super cool, just when I thought the interface couldn't get better, I find out Xara lets me arrange this easily...how the big question that I cannot seem to find the answer to:

    How does one make a button menu (like the default camera icon; when pushed, it reveals a small bar of more tools) as I'd like to construct a custom button/bar like this. Holding shift+alt and ctrl+alt didn't seem to do this nor did I seem to be able to drop a button on top of another button to create one...

    Am I oblivious to something here? Thanks for any help...this is such a cool feature...

  5. #5
    Join Date
    Apr 2015
    Location
    Germany
    Posts
    927

    Default Re: Colour Select & Erase Tool

    I am not 100% sure but I think you can not create cutom fly-out buttons. Please prove me wrong...

  6. #6
    Join Date
    Dec 2007
    Location
    Sunshine Coast BC, Canada. In a beautiful part of BC's temperate rainforest
    Posts
    9,864

    Default Re: Colour Select & Erase Tool

    Sorry siran you are not wrong. You can not create a custom flyout but you can create a custom toolbar that can act as either a floating palette or be docked to any of the four sides of the program window.

    To create a custom toolbar
    1. Go to the Window menu and select Control bars
    2. In the control bars panel click new and name your tool bar then click OK. A new blank toolbar will be created ( it will be quite small but don't worry it will expand as you add buttons)
    3. In the control bars panel scroll down to the bottom and click button palette. The button palette will open and you will see the large selection of buttons you can choose from to add to your toolbar. Hold the alt key and drag buttons from the button palette to your toolbar.
    [SIGPIC][/SIGPIC]
    My current Xara software: Designer Pro 365 12.6

    Good Morning Sunshine.ca | Good Morning Sunshine Online(a weekly humorous publication created with XDP and exported as a web document) | Angelize Online resource shop | My Video Tutorials | My DropBox |
    Autocorrect: It can be your worst enema.

  7. #7
    Join Date
    Dec 2014
    Location
    San Diego
    Posts
    362

    Default Re: Colour Select & Erase Tool

    Quote Originally Posted by angelize View Post
    Sorry siran you are not wrong. You can not create a custom flyout but you can create a custom toolbar that can act as either a floating palette or be docked to any of the four sides of the program window.

    To create a custom toolbar
    1. Go to the Window menu and select Control bars
    2. In the control bars panel click new and name your tool bar then click OK. A new blank toolbar will be created ( it will be quite small but don't worry it will expand as you add buttons)
    3. In the control bars panel scroll down to the bottom and click button palette. The button palette will open and you will see the large selection of buttons you can choose from to add to your toolbar. Hold the alt key and drag buttons from the button palette to your toolbar.
    This is better than nothing and for the most part, easier to set up than most other interfaces I've been privy to use. Thanks!


Bookmarks

Posting Permissions

  • You may not post new threads
  • You may not post replies
  • You may not post attachments
  • You may not edit your posts
  •