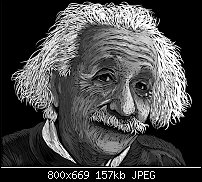
Albert Einstein looks great, Wildrice.
Did you do that in Xara?
Featured Artist on Xara Xone . May 2011
. A Shield . My First Tutorial
. Bottle Cap . My Second Tutorial on Xara Xone
Yes, this was done using Xara P&GD9 and a Wacom Intuos Pen and Touch Tablet (medium, $199). I open a photo with P&GD9 in a layer named Photo, duplicate that layer naming it Background, make the color of the duplicated photo black (creating a perfectly sized black rectangle), add another layer named White Lines, hide the Background to reveal the photo, and then start drawing over the photo on the White Lines top layer.
White Lines (selected for drawing)
Background (hidden)
Photo
When you are finished, unhide the black background and you are left with the sketch lines on a black background. It is basically digital tracing and very easy to do. It just gets meticulous with a detailed photo. You may have to go back and forth between the photo and background to fill in any gaps. The Einstein photo got covered up with lines so I printed the photo out to do some touch ups in this later version. I have found that the major pitfall of this technique is to try to get too perfect and over sketching it. It often looks best with a little black background showing through like an old woodcut. Here is the photo for comparison. Looks like I still need to lighten up his right cheek. I just made the background a gradient as in the photo (darker for more drama), but then grey shined throught, so I had to put a black shape behind him so my black low lights would be evident.
Last edited by WildRice; 05 January 2014 at 04:23 PM.
Excellent work, Wildrice.
And you've got one of my heroes as your avatar!
Featured Artist on Xara Xone . May 2011
. A Shield . My First Tutorial
. Bottle Cap . My Second Tutorial on Xara Xone
I can't take credit for the Bruce Lee avatar image. Some other artist did that years ago before I had Xara. I will have to redraw one myself.
Two more examples of using the $40 Boogie Board LCD, this time using pointillism. I did a product modification by gluing a domed pencil eraser to the blunt end of the stylus which is good for pressing and creating big dots. The pointy end of the stylus is good for small and medium dots (touch sensitive). The Boogie Board images do not upload or save in the $40 version, so you have to take a photo.
Pointillism using dots and dot/drag with an eraser (see how I glued it on the blunt end of the stylus). Less than 60 seconds draw time.
Pointillism using both ends of the modified stylus to make dots. Its there a way to do this easily in Xara P&GD9? This goes very fast with the Boogie Board LCD.
Colors enhanced by software.
I like that Pointillism effect. Both examples look good but I am partial to the frog.
Larry a.k.a wizard509
Never give up. You will never fail, but you may find a lot of ways that don't work.
I am sorry for double posting. I would prefer to just edit my old posts to add something and not create a new post, but I only have a few hours before I am locked out of editing. I will stifle myself more.
Bookmarks